| Affiliation: | Ontopia |
|---|---|
| Date: | $Date: 2001/07/04 16:12:55 $ |
| Version: | 1.1 ($Revision: 1.4 $) |
|
This document is describes how to configure and develop plugins for the Ontopia Topic Map Navigator. Plugins are a general concept that allow extra functionality to be dropped into any web application by simply adding files to a directory. One example of how this could be used is to add a topic map visualization application into the generic navigator.
| 1. Introduction |
| 3.1. The plugin.xml file |
The concept of plugins was introduced into the Navigator because we found that one quite often wants to develop pieces of functionality separately from the rest of the application. These pieces may implement features like searching, reporting, validation, export, and so on, which are largely independent of the other functions provided by a web application.
The Navigator plugins allow you to develop a Navigator extension separately and to deploy it simply by copying some files into a directory. The Navigator will then discover it automatically and create links to it from all topic map and topic pages in the toplinks area.
In this section we develop a trivial plugin and show how to deploy and configure it. The plugin will be linked to from every topic map and topic page, and will display a greeting to the user.
Each plugin must have its own directory under the plugins directory (by default ${basedir}/jakarta-tomcat/webapps/navigator/plugins). This directory must contain a file called plugin.xml with the configuration of the plugin. So to get started, create a directory called hello and create a file called plugin.xml with the following information in it:
A trivial plugin.xml file
<plugin id="hello">
  <title>Hello</title>
  <descr>Receive a greeting.</descr>
  <uri>plugins/hello/hello.jsp</uri>
</plugin>
This file gives the plugin a link text (the title) and a help text (the description) which will be shown by the navigator. The URI is the URI of the plugin page. This URI can be relative or absolute, and there are no constraints on where the plugin page can be located. This means that pages external to the Navigator can be turned into plugin by making configuration files for them.
Note that you can update the list of plugins and change their configurations while the server is running by reloading the application configuration.
In this case we refer to a JSP page called hello.jsp in the plugin directory. The source code to that file is given below.
The hello.jsp page
Hello, world!
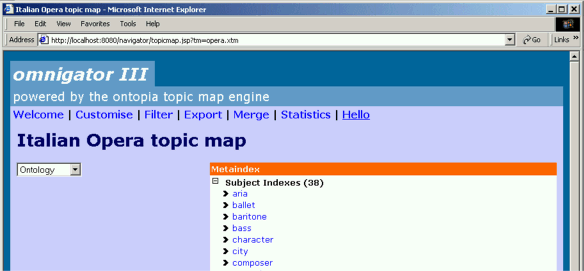
Once these two files are installed the topic map page of the Navigator automatically changes to include a link to the plugin, as shown in the screenshot below. The 'Hello' link goes to the plugin's hello.jsp page.

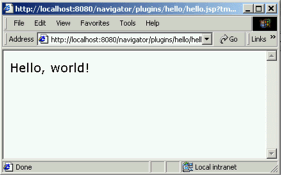
By clicking on the 'Hello' link we go to the page displayed below.

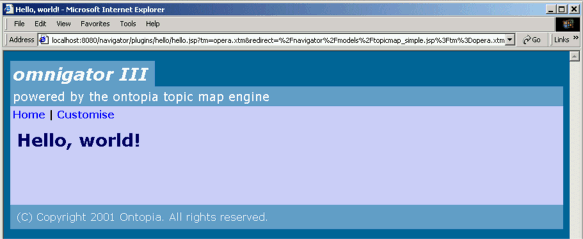
This page is of course not very interesting, nor does it look like the other pages in the Navigator. The last problem can be solved by using the Navigator template system. The page below has the same content as the first hello.jsp but uses the template system of the Navigator.
A more advanced hello.jsp page
<%@ page import="
  net.ontopia.topicmaps.nav.conf.*,
  net.ontopia.topicmaps.nav.generic.*,
  net.ontopia.topicmaps.nav.plugins.PluginIF,
  java.net.URLEncoder"
%>

<%@ taglib uri='http://www.ontopia.net/library/jsp/taglibs/template.tld'
           prefix='template' %>

<%
  RequestConfig rconfig = ControlServlet.initRequest(request, application);

  // Response header: contentType and charset determined by application
  String charset = rconfig.getTopicmapConfig().getCharset();
  String contentType = rconfig.getControlConfig().getContentType();
  response.setContentType(contentType + "; charset=" + charset);
%>

<template:insert template='<%=rconfig.getControlConfig().getViewPath() %>'>

<template:put name='skin' body='true'><%= "../../" + rconfig.getControlConfig().getSkinPath() %></template:put>

<template:put name='head' body='true'>
  <meta http-equiv="charset" content="<%=charset%>">
</template:put>

<template:put name='title' body='true'>Hello, world!</template:put>
<template:put name='heading' body='true'>Hello, world!</template:put>

<template:put name='toplinks' body='true'>
<a href="../../index.jsp">Home</a>
<%
 PluginIF customise = rconfig.getApplicationConfig().getPlugin("customise");
 if (customise != null && customise.getState() == PluginIF.ACTIVATED)
   out.println(" | " + customise.generateHTML(pageContext));
%>
</template:put>

<template:put name="navigation" body="true"></template:put>
<template:put name="display" body="true"></template:put>
<template:put name='outro' body='true'></template:put>
<template:put name='application' content='/fragments/application.txt'/>
<template:put name='banner-tagline' content='/fragments/tagline-banner.jsp'/>
<template:put name='footer-tagline' content='/fragments/tagline-footer.jsp'/>

</template:insert>
This page looks as shown below.

You can find this plugin in the hello directory of the plugins directory.
Plugins can of course do more than this, and they can also be configured to a greater extent than what has been shown so far. This section gives a complete overview of the plugin concept and what can be done with it.
Note that there are also options in the application.xml file which are relevant for plugins. See The Ontopia Navigator Configuration Guide for more details.
In the plugin.xml file the following elements are understood by the plugin framework:
This element can be used to give the plugin simple name/value string pairs as part of its configuration. Ontopia has no defined meanings for any of these pairs, but plugin writers can define their own. The name attribute contains the name of the parameter, and the value attribute contains the parameter value. These pairs are made available to plugin code. (Not required.)
Note value attribute is not required; the value can be given as element content instead.
In addition to these elements, the following attributes can be set on the plugin element:
If this attribute is set, the plugin framework will interpret it to be the name of a Java class that implements the net.ontopia.topicmaps.nav.plugins.PluginIF interface. This class will be instantiated and used to represent the plugin. The interface of this class is documented in the navigator javadoc.
If this attribute is not given the DefaultPlugin class will be used.
The net.ontopia.topicmaps.nav.plugins.TextPlugin plugin can be used to insert any HTML in the form of a plugin. This plugin class requires the title and description elements, and the text parameter.
The text parameter is used to give the plugin the HTML that will be inserted into the topic and topic map pages. This makes it very easy to add plugins that are forms, images, or other interesting things. Note that the parameter element need not have a value attribute, but that the value can be given as element content instead.
The samples directory in the plugins directory contains some interesting examples of this.
Implementing a plugin class is mainly useful when you want to produce other HTML on the topic map and topic pages than a simple link. You may for example want to make a little form with a search field or something similar. Another thing that plugin classes may be useful for is to control which pages link to the plugin. The fulltext search plugin, available as part of the fulltext search engine product, uses this to only create links from topic maps it has indexed.
The core of the PluginIF interface is the generateHTML method, which is called by the web application in order to have the plugin produce its HTML output. To this method is passed enough information that the plugin can tell what the current topic and topic map are, and it can also get request and application information.
To see an example of a real plugin that does real work you can look in ${basedir}/jakarta-tomcat/webapps/navigator/plugins/merge, where you'll find the merge plugin. This consists only of JSP pages and is quite simple to understand.