|
k42 User Guide
|
This document contains a users guide to using supplied k42
applications, namely the TopicMap View (TMV) and WebAuthor (WA)
applications.
Who should read this document?
This document should be read by users who understand a little
about topicmaps modelling and want to use the k42 GUI applications to design,
edit and navigate topicmaps. The document explains the functionality of
WebAuthor and TMV version 1.1, but does not cover a discussion of the semantics
of topicmaps or the usage and applicability of topicmaps. Rather, the document
is a user guide for operating and understanding the functionality and layout of
our topicmap GUIs.
Getting Started
WebAuthor and TMV are both HTML-based browser applications
that, the standard installation, are served from the Tomcat Web server. They
are accessed from the following URL:
http://domain:port/k42/tmv/index.htmland will be functional after the k42 server has been started. To import and export topicmaps into the system, go to the TMV application and use the form-based screens that are described in the appendix of this document. Both of the interfaces are based on stateless http, just like a normal web site, so changes that you have made, externally from the applications, will not be visible until the next request is submitted. Additionally, we do not advise the user to operate the browser "back" and "forward" functionality whilst using these applications - doing so may cause unexpected or confusing results.
WebAuthor and TMV
TopicMap View and WebAuthor are based on the same application
architecture. Both of them are based on the TMV DTD which defines the XML that
is produced by calls to ik42 from JAVA servlets. WebAuthor and TMV both use the
same JAVA class for returning XML representing a topicmap graph: they only
differ in terms of presentation. WebAuthor uses XSLT to create HTML list boxes
and editing forms that are supported by JavaScript, whilst TMV uses XSLT to
produce a more straightforward HTML representation of the data that contains
hyperlinks.
WebAuthor
WebAuthor is designed to allow k42 users to have an all-purpose tool
for creating small to medium sized topicmaps. It is especially
useful for training, for learning about topicmaps and for designing ontologies
or for trying out different approaches to authoring.
TopicMap View (TMV)
TMV is designed to allow users to navigate topicmaps. It exposes
each topic characteristic as a hyperlink so that users can navigate the
topicmap from the perspective of topics and topic
associations.
Introduction
k42 WebAuthor is designed to enable users to interact and
manipulate topicmap models within k42 from the convenience of their web
browser. WebAuthor contains screens and options for creating, retrieving and
editing topics and topic associations so that topicmap authors can quickly
design schemas and ontologies. Version 1.1 of WebAuthor incorporates many
improvements over the 1.0 release, including improved navigation, TMQL query
support, arbitrary properties and reification of topic
associations.
WebAuthor 1.1 features:
| Create and Edit topics with identity, names in scope, typed occurrences in scope, super-classes, classes and unlimited name/value properties. | |
| Create and Edit topic association templates, allowing you to specify role defining topics, role playing topic types and arcs between roles. | |
| Use topic association templates to produce specific instances, setting the role playing topics and scope. | |
| Reify any association - allowing access to create and maintain any of the topic characteristics. | |
| Access objects in the topicmaps via extensive typed indexes and the first TMQL implementation. | |
| Use the accompanying TMV interface to navigate and export your model to XTM. | |
| Learn the TMV XML DTD and k42 API to produce your own interfaces and customisations. |
Contents
The following sections of the user guide provide a detailed
walk-through of all the WebAuthor 1.1 features and functionality. TMV features
are included as an appendix, as both applications share common presentation and
GUI controls.
Introduction
WebAuthor is a web-browser based application created using the ik42
API, servlets and common web technologies such as HTML, CSS and JavaScript.
Many of the features of the interface will therefore be familiar to anyone who
has used web-based forms and navigation before. The current release is designed
and supported for the Microsoft Internet Explorer 5.5
browser.

The WebAuthor interface is divided into three main sections. These
provide for topicmap navigation and editing. A set of navigation indexes is
presented at the top of the screen, index lists are displayed on the left hand
side and the main screen area is used for displaying the various editing and
set-up forms. The following diagram shows the interface as it will appear in
typical use:
- The navigation menus
- The editing options
- The index pane
- The forms pane
The flexibility of the topicmap modelling paradigm requires a
flexible interface for easily creating topics and topic relationships. The
interface is divided into these sections so that the topicmap can be navigated
whilst specific entities are being edited. This is because existing topic
entities are often used in the creation and arrangement of new
ones.
Customisation
All of the WebAuthor interface files are provided with the k42
distribution and are accessed from the web server that is being used in
conjunction with k42. All of the interface is copyright to empolis, however in
some cases, users may find that they wish to customise or adjust the interface
for their own needs (for example, the font sizes used by default are quite
small). WebAuthor uses the TMV DTD as its data schema.
WebAuthor treats the scopesets of topicmap as though they are
all set to "inactive", meaning that all names, occurrences and associations are
displayed regardless of their scopes. This is to ensure that the author has
access to all of the topic characteristics for editing. For a more detailed
discussion of scope, see the
TMV
section. TMV enables the navigator to select which scopesets they wish to use
whilst viewing the topicmap.
Navigation allows users to select, view and use
topics.
WebAuthor provides several mechanisms for navigating topicmaps. The
main index mechanism is the same as that for TMV. The top bar of the interface
contains these controls:

-
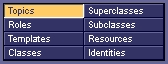
The index type selectors: These allow the users to specify the "Class" of topicmap object that they wish to index.
-
The index range selectors: These buttons define the range for the index search - for example clicking "All" returns all the topicmap entities of the selected type.
-
The search options: In addition to the indexes, WebAuthor and TMV also allow users to perform a simple "find" operation and also complex TMQL queries.
Objects within the topicmap are accessed using indexes. Each index
returns a list selection box that allows the user to access the objects. The
index type selector defines the type or class of object upon which subsequent
index range selections will be made. For example, the "Templates" selector sets
the index class to be topic association templates and normally any lists that
are returned, while this is selected, will be of this class.
|
Topics: is the default selection. With this
type specified, the indexes will return topics.
| |
|
Roles: With this selection, users can list
topics that define roles within topic associations.
| |
|
Templates: lists topic association
templates.
| |
|
Classes: filters the indexes to only include
topics that are used as classes within the model.
| |
|
Super-classes: filters the indexes to only
include topics that are used as super-classes in the model.
| |
|
Subclasses: filters the indexes to only
include topics that are used as subclasses in the model..
| |
|
Resources: sets the list type to be resource
topics. These are topics that have resource references such as those used to
represent the resource aspect of occurrences.
| |
|
Identities: sets the type to be topics that
are used to establish identity in the topicmap. These are topics that contain
subject indicator or resource references.
|
The index type selector is used to set the type of objects for the
indexes. The range selector is used to return indexes within that type group.
There are four main classes of range:
-
All: This returns all of the objects within the type classification.
-
n: This returns all objects within the classification whose name(s) begin with a numerical character.
-
&: This returns all objects within the classification whose name(s) begin with a non-alphanumerical character.
-
Alphabetical ranges: All of the other letters thereafter return an index that is ranged between the letter that has been selected and the next alphabetical letter. For example, selecting "Topics" and "A" from the index selectors will return all the topics who have a name beginning with "A".
Special functionality for resources and
identities
5. disabled: Users will find that not all of these
ranges are always available. When either "Resources" or "Identities" are
selected in the index type selector, all of the ranges are disabled except for
the "all" button. The reason for this is that alphabetical ranges are not
especially useful for these classes of objects, as both resource references and
subject indicator references are typically of the URI type and these objects
will normally be unnamed topics. Therefore, instead of the alphabetical ranges,
the user is expected to use the Find operation described
below. For these two types of indexes, this function behaviour is modified
slightly so that it uses a URI look-up method in the ik42
API.
The search utilities

The search utility offers two main types of search: At the top is a
text entry box for a simple "find" operation (1). This finds
an object by looking for a match on the object's names with the entered value
that is submitted when the user clicks on "go" (4). This is a
convenient way of retrieving an object that the user already knows the name of.
This class of object that is returned by the find operation is dependent on the
index type selector, so if "Templates" is selected,
theFindcommand will look for topic association templates that
have a name, matching the string entered by the user. In addition,
theFind command functionality is different if either the
"Resources" or "Identities" index type selector is chosen. In these cases,
"Find" uses a URI look-up method and returns lists of objects by matching
against parts of the URI string. For example, if the user enters:
http://www.mydomain.orgthey will return a list of objects that have resource references of subject indicators beginning with that domain identifier. This is different to the functionality for the other index type selectors, where "Find" more simply looks for a name match.
Below the find entry is the TMQL search query entry. This
is divided into two main parts: The drop-down select
box(2)allows the user to define the first part of a TMQL
"SELECT" statement. The values in the box correspond to the objects that
WebAuthor supports. Once this part of the TMQL statement has been set, the user
is then required to enter the remaining expression that they wish to use in
their query(3). For example, selecting topic from the
drop-down box and then entering x WHERE x named "person" will
result in the TMQL query
SELECT topic x WHERE x named "person"being submitted when "go" is clicked. For a full explanation of TMQL and associated grammar please consult the TMQL reference documents.
The diagram below shows one such example. This list is displayed in
an HTML selection box (2) in alphabetical order (or in order
of range) and the user now has access to the objects within that list, either
to assign as characteristics of other objects in the editing forms or to edit
themselves.
 The edit options that are available for
any selected object are shown in the menu bar above (1). These
are explained in more detail below. Normally the user has the ability to select
multiple objects within these lists and then can do this in the normal way: by
click-dragging the mouse or using the shift-click/ctrl-click standard windows
behaviour. Multiple objects can often be assigned at once to topic
characteristics. If the user has selected multiple objects and then performs an
action that only applies to a singular object, the topmost object in their
selection is used.
The edit options that are available for
any selected object are shown in the menu bar above (1). These
are explained in more detail below. Normally the user has the ability to select
multiple objects within these lists and then can do this in the normal way: by
click-dragging the mouse or using the shift-click/ctrl-click standard windows
behaviour. Multiple objects can often be assigned at once to topic
characteristics. If the user has selected multiple objects and then performs an
action that only applies to a singular object, the topmost object in their
selection is used.
Long Names and Scrolling
It is quite possible that the names or identifiers of the objects in
the list selection box are quite long, and in order to help the user to read
long names, the lists area will scroll both vertically and horizontally. White
scrollbars will appear, whenever part of the list box is hidden within the
frame space of the browser. In addition, for each item that is selected in the
list, the full name will be displayed in the blue status bar at the bottom of
the browser window. This will appear as shown here:
When there are no objects within the index type and range, or when a
search has not yielded any results, a message is displayed in the left hand
index pane. Below this message is listed a list of links. This is the
WebAuthorhistory list. Because WebAuthor is transaction based,
it is not possible to keep cached pages of lists and edit forms, as the
underlying data may have been changed since the list was first created. The
user will therefore find that they are unable to use the browser "back" button
to step back through cached pages. Instead, WebAuthor maintains its own list of
previous indexes or searches and makes this list available, whenever a search
comes up empty. This list operates in a "one on, one off" fashion and is kept
limited to ten entries. This history list is a list of "performed searches"
rather than "returned results", so searches that return no objects are appended
to the list in the same way that successful ones are.
Situated just above the index pane is the options menu. This
contains icons that allow the user to move through the editing screens. Options
become available and disappear depending on what type of object is selected in
the lists. The diagram below shows the full set of options.
-
Create new topic: This icon is always available and opens a new, blank, topic edit screen in the forms panel.
-
Create new topic association template: This icon is also always available. Clicking on it, opens a new, empty topic association template form.
-
Step back through history list: Clicking this icon, moves the user back through the last ten indexes or searches they performed, starting with the latest first. The icon disappears when the user has reached the bottom of the list. Every index or search that is performed is appended to the top of this list, causing the lowest one to be removed.
-
Edit: This icon opens up an object for inspection and editing. This opens the primary editing environment for that type of object, for example, a topic association template is opened for editing in the topic association template form. All of the characteristics for that object that can be manipulated by WebAuthor, are displayed in these forms.
-
Delete: Clicking this icon removes any of the selected objects in the list from the topicmap. A warning dialogue is displayed before this happens, allowing the user to cancel this action.
-
Instances: This allows the user to list any instances of the current object that they have selected in the lists. The current list is then replaced by the new list, containing the instances.
-
Reify (edit as a topic): One of the most powerful aspects of the k42 topicmap model is the ability to perform reification on topic associations. This means that whilst these types of object can be edited in their own right, they can also be treated in WebAuthor as standard topics as well. This icon allows the user to edit a topic association as if it was a topic.
-
Instantiate: Topic association templates are used to define roles and the types of topics that can play roles. These templates are then used to "stamp" out sets of specific instances, where topic instances are assigned as role playing topics. This model is very useful for categorising and organising types and sets of associations and is an invaluable aid to ontology design. WebAuthor allows any template to be "instantiated" and when this is possible, this button will appear.
Introduction
Most of the editing and authoring in WebAuthor consists of two main
types of user input: either entering text directly into fields or assigning
existing objects from the topicmap to fulfil certain characteristics. For
example, names can simply be typed in by the user, however the objects that are
used as scope on names are topics, so these need to be selected from the
indexes and assigned to the scope field. topics are the building blocks of the
topicmaps and are used in a very flexible and versatile way. It may take a
little while for users to feel happy with the ability to connect topics
together in so many different ways, however once they do so, they will realise
what a powerful, flexible and easy semantic model it is.
Entering text
Whenever a user has the option to enter text, they will see the
following icon:
Using topics
Many of the characteristics of topicmap objects are not simple
values that are typed in by the user, but really are connections between
topics. This means that Authoring in WebAuthor is not simply a matter of
entering field values into a table, but is much more an exercise in creating
links between topics. This is why WebAuthor is arranged so that you always have
access to topics via the indexes, whilst authoring or editing an individual
object. The following diagram encapsulates the typical "linking" edit field in
WebAuthor.
Assigning and Deleting topics
To assign topics to a characteristic group, select
topics from the list box on the left-hand pane and click on the "+" icon below
the entry box for that characteristic. A message will appear if any of the
topics you are assigning already exists as part of that characteristic.
Todelete topics from a characteristic, select a group of them
from the selection box and click on the "-" icon below that
box.
Selection boxes
The selection boxes are shown with either two different background
colours. A blue background means that box is part of a group for a
characteristic, such as occurrences. A grey background means that the box is
the only field entry for that characteristic. The characteristic is always
shown as a label on the left-hand side of any row of editing fields or boxes.
Most selection boxes allow you to select multiple topics within them
.
How to create and edit a topic.
The next sections take the user in detail through each of the
editing fields. Each entry has a step-by-step guide to the options for editing
the characteristic.
Duplication
A word on duplication: WebAuthor will not allow users to ever create
topics with the same identity. This applies to all of the identity fields and
also in circumstances where two topics share the same unscoped names. In cases
where a user submits a topic form and there is already a matching topic in the
map, WebAuthor will bounce the user to the existing topic instead of creating a
new one.
Identity is a crucial part of the topicmap
paradigm. It allows the topicmap author to establish the uniqueness and context
of the entities and subjects that they wish to describe. Identity is the
cornerstone of topic manipulation, comparison and merging. In contrast
tonaming, which is the characteristic used for describing and
talking about topics, identity is the characteristic by which
topics are anchored to the uniqueness and reality of a
concept.
Resource References and Subject Indicators
Topic identity is expressed by using either one or the other of a
single resource reference or one or more subject
indicator references. A resource reference is used when a topic is
being created as a handle on a real-world resource that can be reached, such as
a web page or a document in a database. A resource topic is the means by which
that resource is represented in the world of the topicmap. In contrast, subject
indicators are used to establish the context and uniqueness of a topic. Unlike
a resource reference, it is possible to have more than one subject indicator
reference. For example, a topic that is used to represent a location, might
have a subject indicator for each of its X and Y co-ordinates. Any topic that
has exactly those two subject indicators is describing that precise location
and therefore are said to be the same concept.
Authoring Identity
Identity in WebAuthor is always created on the topic edit screen. It
is positioned at the top of the form and can either be set as an entry for a
resource reference or as a multiple entry for subject indicators. Identity is
specified by user entry, and not by linking to existing
topics.
Resource Reference
The user can type in a string, representing a resource reference
into the edit field, shown below (2).
 The label for this
characteristic(1) shows whether the user has decided to enter
a resource reference or a subject indicator. In order to switch to the other
option, the user should click on the "go" button. If there is a value in the
text field, the user will receive the following warning:
The label for this
characteristic(1) shows whether the user has decided to enter
a resource reference or a subject indicator. In order to switch to the other
option, the user should click on the "go" button. If there is a value in the
text field, the user will receive the following warning:

Subject Indicators
The editing environment for subject indicator references is a little
different. Here, the user can enter multiple values by entering each one into
the text field (2) and adding it to the group by clicking on
the "add" icon (3).
 Each subject indicator reference value
is shown in the list box (4) and they can be removed by using
the delete icon, as described in the introduction to this section. If they want
to, the user can toggle to the resource reference entry (5),
although doing so whilst there are values in the subject indicator box, will
bring up a warning dialogue like the one shown above, because the subject
indicator values will be lost.
Each subject indicator reference value
is shown in the list box (4) and they can be removed by using
the delete icon, as described in the introduction to this section. If they want
to, the user can toggle to the resource reference entry (5),
although doing so whilst there are values in the subject indicator box, will
bring up a warning dialogue like the one shown above, because the subject
indicator values will be lost.
Adding names to topics and scopes to names
Topics can have multiple names and each name can be "scoped" by
multiple topics. This allows topicmap authors to describe their topic concepts
in multiple ways, for example they may provide names for different languages or
for different information systems. Topic naming is extensive in this way
because topics represent concepts and subjects, not labels. WebAuthor lets you
create multiple names for topics, and sets multiple topics for scope on each
name. The user interface for this is shown below.
 To add a name, the user
must enter text in the name entry field (1). This can then be
added to the group of names shown below it (2). This box
contains the list of all the names on the topic, and for each one that is
selected, the corresponding topics that are used as scope on that name, are
shown in the adjoining select box (3).
To add a name, the user
must enter text in the name entry field (1). This can then be
added to the group of names shown below it (2). This box
contains the list of all the names on the topic, and for each one that is
selected, the corresponding topics that are used as scope on that name, are
shown in the adjoining select box (3).
Adding scope to names
To add topics as scope on a name, find the topics that you want to
add in the indexes. Then, with these selected in the left-hand pane, highlight
the name, as shown above. If the user then clicks the "add" icon below the
scopes box, the topics that have selected in the index, will be added to the
scope for the highlighted name.
Creating Occurrences
Occurrences are special relationships between topics and resources.
The relationship contains information on the resource location and type, and it
can be scoped with topics like names. The following diagram shows the
occurrence edit fields. To create
an occurrence, the user enters the resource reference in the text entry
field(1). When the occurrences are created, after the form is
submitted, this value will be used to create a resource topic. A topic can have
multiple occurrences (2), because it can have relationships
with multiple external resources. For example, a topic representing a person,
might have occurrences to the person's CV and photograph. To specify the type
of the occurrence in such a way, the user assigns topics to the accompanying
classes field (3). This box shows the classes of whatever
resource reference is selected in the occurrence resource
box(2). Also, the topics that are used for scope on each
resource, listed in the occurrences box, are shown in the scopes
box(4). This is edited in the same way as scope on names,
described in the paragraph above.
To create
an occurrence, the user enters the resource reference in the text entry
field(1). When the occurrences are created, after the form is
submitted, this value will be used to create a resource topic. A topic can have
multiple occurrences (2), because it can have relationships
with multiple external resources. For example, a topic representing a person,
might have occurrences to the person's CV and photograph. To specify the type
of the occurrence in such a way, the user assigns topics to the accompanying
classes field (3). This box shows the classes of whatever
resource reference is selected in the occurrence resource
box(2). Also, the topics that are used for scope on each
resource, listed in the occurrences box, are shown in the scopes
box(4). This is edited in the same way as scope on names,
described in the paragraph above.
Topics can be connected together in terms of hierarchy, and to
do this, the author has two options. They can
addsuper-classesto a topic and they can make the topic
aninstance of other classes. These two editing fields are
shown below. They work in the conventional manner - the user selects topics
from the indexes and uses them to create these typed links by adding or
removing them from these fields.
 The super-classes
box(1) displays all the topics of which the current topic is
represented as a subclass in the model. The
classes(2) box shows all the topics of which the current topic
is said to be an instance in the model.
The super-classes
box(1) displays all the topics of which the current topic is
represented as a subclass in the model. The
classes(2) box shows all the topics of which the current topic
is said to be an instance in the model.
Properties are an extended feature of k42
topicmaps.
Authors may wish to specify properties to objects that are not
defined using the semantics of typed links and associations. The k42 API allows
developers to provide this functionality to their users and we have added this
to our WebAuthor interface. Theproperties section of the topic
edit form enables users to specify limitless "name/value" pairs as properties
to a topic.
Creating properties
Properties consist simply of a name and a corresponding value. The
diagram below shows how these can be added to a topic. The user enters the name and value for the
property into the text fields (1) and (2).
They can then add this to the property group by clicking on the "add to group"
icon (3). The list of properties on the topic is displayed
below (4) - with each name and value pair shown in a row with
the name in bold text on the left. At the end of each row is
a "remove" icon (5) that will remove the property from the
topic when clicked.
The user enters the name and value for the
property into the text fields (1) and (2).
They can then add this to the property group by clicking on the "add to group"
icon (3). The list of properties on the topic is displayed
below (4) - with each name and value pair shown in a row with
the name in bold text on the left. At the end of each row is
a "remove" icon (5) that will remove the property from the
topic when clicked.
How to create and edit a topic association
template.
WebAuthor enables topicmap designers to create topic association
templates that define the roles and type of topics to play the roles in an
association. In addition, WebAuthor also features arcs between roles and
association reification. All of these features make the topicmap semantic model
much more powerful and interesting. Like topics, association templates are
created and edited, using HTML web forms. However, unlike the topic screen,
association screens differ slightly between the "create" and "edit" processes.
The following section explains the topic association template create form and
describes step-by-step how to define a template.
The template create screen sets up a template, from which
multiple "instances" can easily be defined.
Associations consists of "ends" which in turn define "roles" within
the association with a "role defining" topic and a "role playing" topic. Topic
association templates are basically associations that specify the role defining
topic and the "type" of topic that can play that role. That is, the class of
topic whose instances will be used, when the template is
instantiated. This is useful because it allows topicmap authors to design
ontologies that contain sets of high-level templates, describing the structure
and relationships between topics, without directly describing specific
relationships. For example, a template for "family" might be defined from which
individual familial associations can be created.
The WebAuthor "create template" screen is accessed from the
menu options. Its main components are shown in the diagram below. A detailed
explanation of each aspect follows underneath.
-
Each template can be given a single name directly. To do this, enter text in the field marked by the "pen" icon.
-
The user then defines the roles for the template association. Multiple roles can be defined, one at a time, by assigning a topic from the indexes as the role definition...
-
...and role type. Remember, for the templates, this topic is the class topic whoseinstances can be used, when the template is used to create an association instance.
-
When the role defining and role player type topic is assigned, the user adds the "end" to the group, by clicking the usual icon. The group of ends is shown in the large blue select box.
-
For every role in the association, WebAuthor allows the user to specify arcs between all the other roles. Arcs complete the association model, as they allow the topicmap designer to specify the direct typed link across association ends. The arc direction shows the direction to be labelled and the...
-
...arc label allows the user to type in the text that they want to use to describe the arc.
This information can now be added and the association template
is created in the topicmap. It can now be accessed in the indexes and
instantiated from the menu options.
Topic association template roles cannot be edited once they
have been defined, as they are used to define and type the roles of all
children associations.
Editing a template end would invalidate any children that had
created from it, and WebAuthor v1.1 does not attempt to address this
dependency. The relationship between template and child is such that, if a
topic association template is deleted, all of its children are removed too. It
is important to stress that the ik42 API is flexible enough to allow developers
to make their own application specific judgements on this behaviour and to
decide how to affect the underlying model, based on the sematic dependency
between template and child.
For WebAuthor v1.1, the template roles can only be edited,
whilst the template is being created. There after, only the template name and
the arc labels between the roles can be altered - these characteristics are
both inherited by children, and so the changes simply propagate amongst them.
The diagram below shows the edit screen for templates:
 The reader will notice that there are no role
definitionandrole player type
entries.(1) is an editable field containing the
name,(2) shows a description of each role and
(3)and (4) show the arcs. Additionally, any
children of the template that have been created are listed on this screen and
can be navigated to.
The reader will notice that there are no role
definitionandrole player type
entries.(1) is an editable field containing the
name,(2) shows a description of each role and
(3)and (4) show the arcs. Additionally, any
children of the template that have been created are listed on this screen and
can be navigated to.
Although WebAuthor imposes this restriction on editing, do not
forget that all topic associations can be edited
asreifiedtopics by selecting an association from the indexes
and clicking the "edit as topic" icon in the menu options.
Topic associations instances are created from
templates.
Association instances are created as children of a template, and
their roles and role playing topic type is defined in the template. It is very
easy and quick for a topicmap Author to produce instances from a template. To
do so, select the template that you want to instantiate from
the index lists and click on the instantiate icon in the menu
options.
The instance form
The diagram below shows the topic association instance form: The instance form shows the name of the template that it was created from at
the top (1). Because the template sets the role defining
topics and the type of the role playing topics, all the user has to do to
create an instance, is set the role playing topics. The
instance form provides information as to the role definition and the type of
topic that should play that role (2). The role playing type is
provided as a hyperlink so that the user can quickly return an index of all the
topics of that type. Topics of that type are then added to the role player
entries(3) in the usual manner. And that's it. If the user
assigns a topic when there is already one shown in the entry, the existing one
is over-written. By default, when the instance form is first created from the
template, the role playing topics are the same as the role playing typing
topics. Additionally, the association instances can be scoped, and so there is
a topic group box for this at the bottom of the form (4),
which is edited in the conventional way.
The instance form shows the name of the template that it was created from at
the top (1). Because the template sets the role defining
topics and the type of the role playing topics, all the user has to do to
create an instance, is set the role playing topics. The
instance form provides information as to the role definition and the type of
topic that should play that role (2). The role playing type is
provided as a hyperlink so that the user can quickly return an index of all the
topics of that type. Topics of that type are then added to the role player
entries(3) in the usual manner. And that's it. If the user
assigns a topic when there is already one shown in the entry, the existing one
is over-written. By default, when the instance form is first created from the
template, the role playing topics are the same as the role playing typing
topics. Additionally, the association instances can be scoped, and so there is
a topic group box for this at the bottom of the form (4),
which is edited in the conventional way.
Naming association Instances
Topic association instances - associations that are created from
templates - do not have their own name, but rather inherit the name from the
template that described them. This means that unless the topic association is
edited as a topic (reified) and given its own names, it will always appear with
the same name of the template. We think it is good practice to make sure that
each instance has a reified topic name so that they can be listed intelligently
and are not confused with their template.
This section of the user guide explains the functionality of
k42 TopicMap View (TMV).
Scopesets
| |||||||
Management Functions
| |||||||
| Menu Options | |||||||
Navigation
|
TopicMap View is for navigating a topicmap.
TopicMap View and WebAuthor are based on the same application
architecture. Both of them are based on the TMV DTD which defines the XML that
is produced by calls to ik42 from JAVA servlets. WebAuthor and TMV both use the
same JAVA class for returning XML representing a topicmap graph: they only
differ in terms of presentation. WebAuthor uses XSLT to create HTML list boxes
and editing forms that are supported by JavaScript, whilst TMV uses XSLT to
produce a more straightforward HTML representation of the data that contains
hyperlinks. The hyperlinks make TMV more useful for moving through a map from
object to object. The TMV interface also has management forms for importing,
exporting and deleting maps. One of the big advantages of using TMV to
WebAuthor for navigating topicmaps is, that TMV allows the user to choose which
scopesets to use, whilst navigating.
Much of the TMV interface works in the same way as WebAuthor.
Therefore the reader is advised to refer to the WebAuthor guide also. This
section will deal with the aspects of TMV that differ or do not appear in
WebAuthor. First of all, the next section explains the implementation of scope
that we have used for these two applications.
Every set of topics that is used to scope a name, occurrence or
association is a Scopeset.
WebAuthor treats everything as though it is being viewed in all
scopes. This means that everything is exposed to the user so that they can
author all the characteristics of topics and associations without accidentally
missing anything out. In contrast, TMV allows the user to select the scopesets
that they wish to use for viewing the objects in the map. The scopesets are
listed on the left hand side of the screen, where WebAuthor indexes would
appear. The diagram below shows a sample:
- The scope set name is shown on the left hand side. Each topic in the scopeset is shown in the comma delimited name.
- The status box is a switch that turns the scopeset on and off. When this is clicked, the new change will come into effect, the next time that a topic is displayed.
Names, occurrences and associations that do not have scope
topic sets for them are said to be in the unconstrained scope.
This means that there is no reason or ability to determine whether an
application should display them or not. Basically, anything that is in the
unconstrained scope is fair game and should be made available to users. The
usage and interpretation of scope is an interesting aspect of topicmaps. It
would seem sensible that at least some objects in the topicmap have names in
the unconstrained scope, else if that map is read by another topicmap compliant
application, and the topics used for scope are not identified, or have scoped
name themselves, the map will be unviewable, like a locked door with no
keyhole. In time, this may not be such an issue as public or organisational
libraries of identities are compiled that pinpoint the scoping topics in the
map. In the meantime, TMV requires topics used for scope to have a name
in the unconstrained scope. This is so that the initial list of
scopesets can be presented to the user. It might be likely that in a specific
usage environment, the scope status of an interface would be configurable by a
systems administrator and not at the level it is presented for
TMV.
TMV therefore always begins in the unconstrained scope,
so that the rest of the scopesets can be displayed. If a topicmap is imported
that has scoping topics with scoped names, this will cause an
error.
What happens to characteristics that are scoped but that are
required for completeness?
TMV will not display objects in indexes, if either themselves or any
of their names are not included in any of the scopesets that the user has
specified as being in use. However, there are cases where completeness demands
that the user is aware of the presence of some object, even if "in strict
application of the paradigm" it should not be shown. For example, it would be
confusing, when displaying the roles of an association, to just leave a blank
whereever there was a topic that was not in scope. Therefore, TMV is set to
display the name anonymous whenever it was felt that a token
was needed for completeness. "Anonymous" objects can be navigated, although
attempting to navigate to an anonymous object will cause an alert to appear and
the resulting screen may be confusing to some users.
TMV menu icons are situated in the
same place
as those for WebAuthor.
-
Import: This button opens a form for importing topicmaps into k42.
-
Export: This button opens a form that the user can use to export their topicmap to file.
-
Erase: Enables the user to delete their topicmap. These are explained in more detail in the next section below.
-
Reload Scopesets: This option is a refresh for scopesets. It is provided so that the user can re-initialise the TMV scope engine with any new scopesets that have been added since the application was loaded (for example, when used in conjunction with WebAuthor).
-
Back in History: This button is for the index history list. It works in exactly the same way as the WebAuthor mechanism.
Topics Maps can be imported into k42 using this form. Click
thebrowse button to select the topicmap from the file system
and then click import to load it into k42.
The export form allows users to save their k42 topicmap to the file
system as an XML instance. The file is saved as a compressed ZIP.
|
Name sets the name of the file that will be
created when export is activated.
| |
|
Compression sets the type of zip compression
that will be used (either standard zip or gzip).
| |
|
Encoding sets the character encoding for the
saved file.
| |
|
include DTD allows user to choose what type
of DOCTYPE declaration they require in the XML file.
|

TMV provides information and links for topics and topic
associations.
Much of the TMV index navigation is exactly the same as WebAuthor.
There are the same
index type selectors
and
index range selectors,
find
utility and
TMQL search. For the lowdown on all of these please, refer
to the relevant sections in the WebAuthor User Guide part of this
document.
TMV differs in the presentation of the actual topics and topic
associations. Whereas WebAuthor displays the object characteristics within HTML
forms, TMV lists them out as hyperlinks. This enables users to get a better
concept of the models they are creating as they can navigate from topic to
topic.
When an index is returned form k42, TMV displays the list in
the main part of the screen. The example below is typical: Whenever the list is longer than just a few entries, the XSLT creates an extra
Alphabetical index so that users can jump to sections of the list more
easily(1). This index only contains letters for which there
are items in the list. The list itself is a set of
links(2)that go to the information screen for the object when
clicked.
Whenever the list is longer than just a few entries, the XSLT creates an extra
Alphabetical index so that users can jump to sections of the list more
easily(1). This index only contains letters for which there
are items in the list. The list itself is a set of
links(2)that go to the information screen for the object when
clicked.
Topics and association information are displayed in the central
part of the screen.
TMV allows users to set the scopesets that they are using to view
objects. When there is more than one name to display, due to the fact the the
topic has multiple available names in the scope, names are comma delimited. The
name of the current object is displayed at the top of the screen - as shown
below (1). Thereafter, follow the four main groups for
characteristics, described in detail under the example
shown.

-
The object's names in the current scope settings.
-
Properties: Any properties that the object has, are shown below the name title.
-
Identity: Either the subject indicators or the resource reference is shown, if the topic has any.
-
Resources: This shows the occurrences: the resource reference for the occurrence is displayed as a link that targets to a new browser window. The first part is the occurrence class.
-
The Hierarchy characteristics: This group of links show the following in descending order: Subclasses, Superclasses, instancesOf, instances, templates, children. When there is only one object to link to, these are presented with labels that read in the singular. So,
Superclass of.......topic Ameans that topic A is a subclass of the topic being viewed. When there are multiple links, each of these characteristics is presented in a drop-down list box with a pluralised label e.g.Subclasses........ -
Relationships: This section describes the participation that the topic (or topic association) being viewed has, with other topics in associations.
 Plays Roles: describes association ends from the perspective of the current topic being a role playing topic. (For documentation on the k42 topicmap model see ).Is Roles: provides information on association ends where the current topic is the role defining topic.Contains Roles: If the current object being viewed is a topic association, it will contain roles. These are described in the following way: The role playing topics are listed in the left hand drop-down box and the role defining topics are listed in the right hand box.These two drop-down boxes are synchronised - so that the selection of a topic in one moves the selection in the other to the same association end.Arcs: are labelled links between role playing topics in a topic association template. These are shown in the final drop-down list. The arc label is the part before the >>> delimiter.
Setting the view.
In order to make navigation a little quicker, the TMV interface has
a set of buttons at the top-right of the console that enable the user to switch
parts of the topic View on or off, depending on which characteristics they are
interested in. For example, if the user was not interested in seeing
occurrences, they can switch off this characteristic and it will not be shown.
This can be useful for saving screen space for topics with lots of links and
relationships. The example below shows these buttons. The labels correspond to
the different topic and topic association characteristics that are shown in the
display.
 (1)The buttons work as
toggles, when depressed (2) they are blue in colour and the
characteristics is switched off and will not be shown.
(1)The buttons work as
toggles, when depressed (2) they are blue in colour and the
characteristics is switched off and will not be shown.
Copyright (c) empolis UK LTD. All rights reserved.